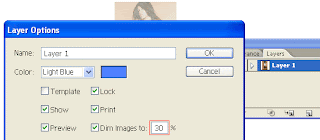
1. Place a photo
First place a photo in Layer 1 by File > Place or Copy & Paste from clip board. Double click on Layer 1 to change the Layer Options. Set Dim Images to: 30% and lock layer.2. Start tracing
Make a new layer (Layer 2). Hold down Ctrl key and click on the eye icon of Layer 2 to view Layer 2 in Outline mode.
These shortcuts are:
- Ctrl+[ = Send Backward (This will send object back 1 step)
- Ctrl+] = Bring Forward (This will bring object front 1 step)
- Ctrl+Shift+[ = Send to Back (This will send object all the way to the back)
- Ctrl+Shift+] = Bring to Front (This will bring object all the way to the front)
- Ctrl+F = Paste in Front (This will paste object in front with same position)

3. Make shadow
Draw a new path as shown (top). Then Copy the base path of the face and Paste in Front. Select the copied base path and the new path, open your Pathfinder, Alt-click on Intersect shape areas.

4. Fill in base color
Now fill in the base color for the face, eye, lips, and eyebrow.
5. Shadow gradient
Fill the shadow path of the face with a Gradient (white-skin tone) and select Multiply for Blending Mode.

6. Body
Use the same technique, copy the gradient fill for the body. Note you might to adjust the gradient of each shadow path to blend in with the overall illustration.
7. Hair
Pretty much the same, fill 1 path with the gradient, then use the Eyedropper Tool to copy the fill.
8. Shirt
Same technique as the previous steps.
9. Skirt
Fill the skirt with a blue gradient, then use the Eyedropper Tool to copy the fill for the shadow.
10. Hair details
Now you can add more details to the hair. Make shadow effect by adding Multiply paths. Add some highlights by using lighter gradient color. If you want, you can add more details to the clothes, lips, or add a cool tattoo on her body.
Final
After you get used to this tracing technique, you can basically trace anything!


0 komentar:
Posting Komentar